How to Run Smart Tests
Overview
This guide outlines how to set up, organize, and manage SmartTests in Git for PR validation. SmartTests help ensure services work correctly by validating runtime behavior in Kubernetes environments. By the end of this guide, you'll have a complete setup where SmartTests run automatically and post results directly to your pull requests. We'll cover:
- Setting up a SmartTest infrastructure
- Organizing tests in Git
- Automating test execution with CI/CD
- Surfacing test results in pull requests
- Best practices for test organization and management
Setup Requirements
Before you begin:
- Install Signadot Operator v0.19+ in your cluster
- Enable Smart Test Runners in your Signadot Dashboard
- Verify at least one runner pod is active in your cluster
Implementation Steps
1. Enable Test Infrastructure
Before writing tests, enable Smart Test Runners in your Signadot account:
- Go to Managed Runners in your Signadot dashboard
- Enable "Smart Test Runners"
The Managed Runners page also hosts Plan Runners (used for agent-based plans). Only Smart Test Runners are required to run Smart Tests.
This setting allows Signadot to automatically manage test runners in your cluster.
2. Create Test Structure in your Git Repository
Set up your repository with this structure:
.
├── .signadot/
│ └── config.yaml # Test discovery configuration
└── smart-tests/
├── frontend/
│ ├── .labels # Frontend test labels
│ └── api.star # Frontend's API tests
└�── backend/
├── .labels # Backend test labels
└── api.star # Backend's API tests
Example configuration files:
# .signadot/config.yaml
smart_tests:
- smart-tests/    # Root directory for test discovery
# smart-tests/frontend/.labels
service: frontend
type: consumer
team: frontend-team
criticality: high
owner: frontend@company.com

# smart-tests/backend/.labels
service: backend
type: provider
team: backend-team
criticality: high
owner: backend@company.com
Example test that you can run immediately:
# smart-tests/frontend/api.star
# Test external API behavior (using httpbin.org as example)

def test_get_api():
    res = http.get(
        url="https://httpbin.org/get",
        capture=True,
        name="getExample"
    )

    ck = smart_test.check("api-behavior")
    if res.status_code != 200:
        ck.error("expected 200 status code, got {}", res.status_code)
This structure enables:
- Clear service ownership through labels
- Easy test discovery via config
- Consistent test organization
- Simple dependency tracking
3. Run Tests
During development, run tests from within your Git repository:
# Test against baseline
signadot smart-test run --cluster=staging

# Test against a sandbox and publish results
signadot smart-test run --sandbox=my-sandbox --publish
When run from within the Git repository, the CLI automatically discovers and runs all tests based on your .signadot/config.yaml and test labels. No additional arguments are needed to specify test files.
Use the --publish flag only in CI environments to avoid polluting sandbox results with local development runs.
For running individual test files outside the repository structure, see signadot smart-test run --help for additional options.
Viewing Test Results
After running tests, you can view results in multiple ways:
- CLI: Use
signadot smart-test execution listandsignadot smart-test execution getto see detailed results - UI Dashboard: View results under the Executions page or directly in the sandbox details if you used
--publish - Pull Requests: As we'll see in the next sections, test results can be automatically posted to your PRs.
4. Automate with CI/CD
Integrate SmartTests into your CI/CD pipeline. Example GitHub Actions workflow:
...
jobs:
  smart-tests:
    runs-on: ubuntu-latest
    env:
      SIGNADOT_ORG: ${{ secrets.SIGNADOT_ORG }}
      SIGNADOT_API_KEY: ${{ secrets.SIGNADOT_API_KEY }}
      SANDBOX_NAME: pr-${{ github.event.number }}-test
    steps:
      # ... other steps
      - name: Set up Signadot CLI
        run: |
          curl -sSLf https://raw.githubusercontent.com/signadot/cli/main/scripts/install.sh | sh

      - name: Create Sandbox
        run: |
          signadot sandbox apply \
            --set name=${SANDBOX_NAME} \
            --set github-pr=${{ github.event.number }} \
            --set image=myrepo/image:${{ github.sha }} \
            -f .signadot/sandbox-template.yaml

      - name: Run SmartTests
        run: |
          signadot st run \
            --sandbox=${SANDBOX_NAME} \
            --set-label foo=bar \
            --publish
The --set-label argument allows you to add dynamic labels at runtime that complement the static labels defined in .labels files. These runtime labels are useful for:
- Tracking test runs by environment
- Adding CI-specific metadata
- Grouping related test runs
- Filtering test results
Labels set via --set-label are additive to the labels defined in .labels files, giving you both static service-level labels and dynamic execution-level labels.
5. Developer Feedback
Test results can be integrated directly into your pull request workflow. If you're using GitHub, you can set up native integration to automatically post test results as PR comments:
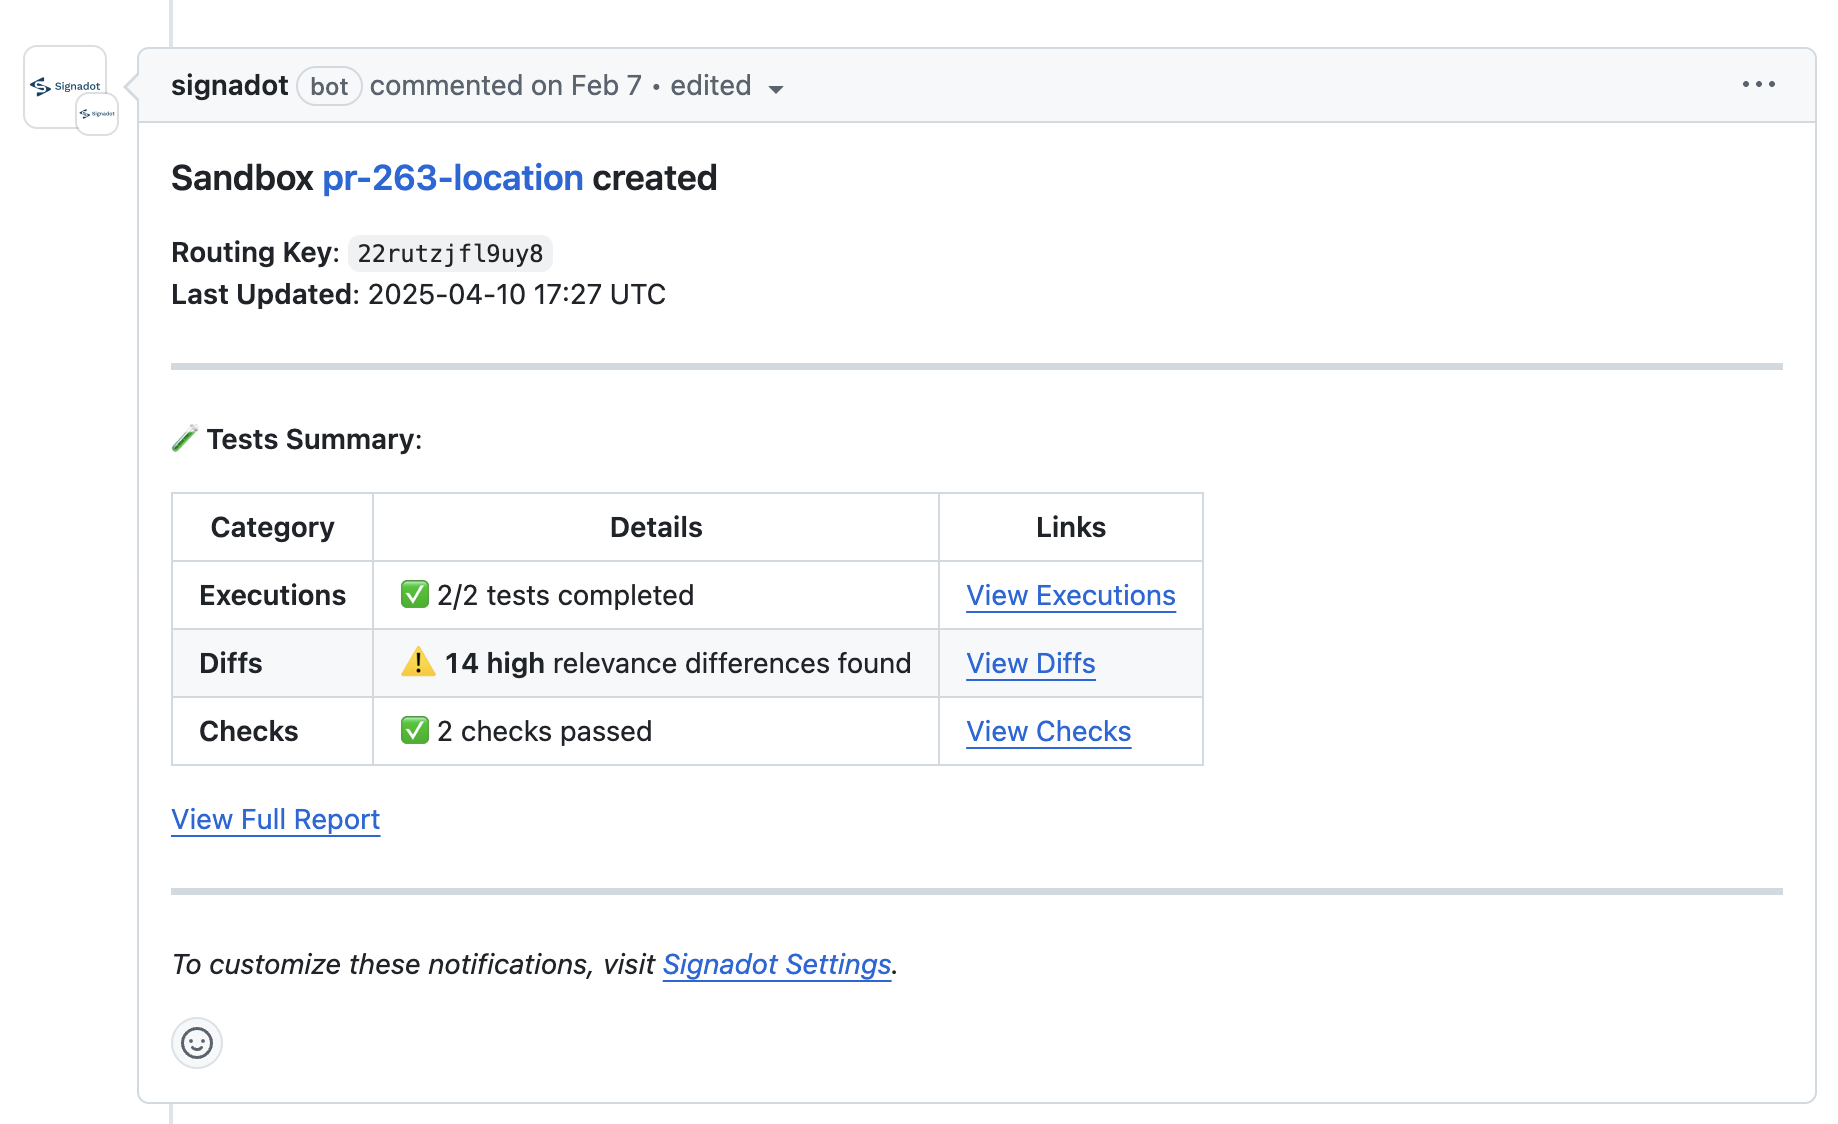
For other version control systems, you can use the sandbox API to fetch test results and integrate them into your existing PR workflow.
Infrastructure Best Practices
Test Organization
SmartTests can be organized in different ways, each with its own advantages. Many teams find value in combining these approaches based on their testing needs.
Centralized Repository Use a single repository with labels to categorize tests by service, team, or functionality. This approach:
- Enables shared ownership and collaboration across teams
- Makes it easier to maintain consistent testing practices
- Facilitates cross-team review of behavior changes
- Works well for tests that span multiple services or teams
Per-Service Repository Keep tests alongside each microservice's code. This approach:
- Maintains clear ownership by service teams
- Keeps tests close to the service implementation
- Simplifies versioning with service changes
- Works well for service-specific behavior validation
Many organizations benefit from using both strategies:
- Centralized repo for cross-team behavior validation and shared infrastructure tests
- Service repos for specific API validation and team-owned behavior tests
Label Management
Set up comprehensive labels to enable future test selection capabilities:
# Example label structure
service: payment-service
type: provider          # provider/consumer
team: platform
criticality: high
owner: platform@company.com
Key label categories to consider:
- Service identification and type
- Team ownership and contacts
- Test priority and criticality
- Service dependencies
- Test categories (e.g., API, events, data)
Conclusion
A well-organized SmartTest infrastructure helps teams catch regressions early and maintain service compatibility through runtime behavior testing. By following these patterns and practices, you can create a scalable and maintainable SmartTest system that improves your overall development workflow.
To learn more:
- Explore the Smart Test CLI Guide for detailed command usage
- Check out our Smart Test Reference for in-depth documentation on test capabilities
- See our Smart Test Concepts for understanding the underlying principles