Create Preview Environments
Overview
In this quickstart, you'll learn how to use Signadot Sandboxes to preview changes to microservices in isolation. We'll use a sample application called HotROD to:
- Create sandboxes to preview new features in different microservices
- Route specific requests to your sandboxes
- Combine multiple sandboxes to preview coordinated changes
This hands-on guide will show you how sandboxes enable fast, reliable testing of microservice changes without affecting the rest of your application. Preview environments can be used to run automated tests like E2E and integration tests, as well as to help developers review and validate behaviors prior to merge.
Setup
Before you begin, you'll need:
- Signadot account (sign up here)
- Signadot CLI (installation instructions)
- A Kubernetes cluster
Option 1: Set up on your own Kubernetes cluster
Using minikube, k3s, or any other Kubernetes cluster:
- Install the Signadot Operator: Install the operator into your cluster.
- Install the HotROD Application: Install the demo app using the appropriate overlay:
- Istio
- Linkerd / No Mesh
kubectl create ns hotrod --dry-run=client -o yaml | kubectl apply -f -
kubectl -n hotrod apply -k 'https://github.com/signadot/hotrod/k8s/overlays/prod/istio'
kubectl create ns hotrod --dry-run=client -o yaml | kubectl apply -f -
kubectl -n hotrod apply -k 'https://github.com/signadot/hotrod/k8s/overlays/prod/devmesh'
Option 2: Use a Playground Cluster
Alternatively, provision a Playground Cluster that comes with everything pre-installed.
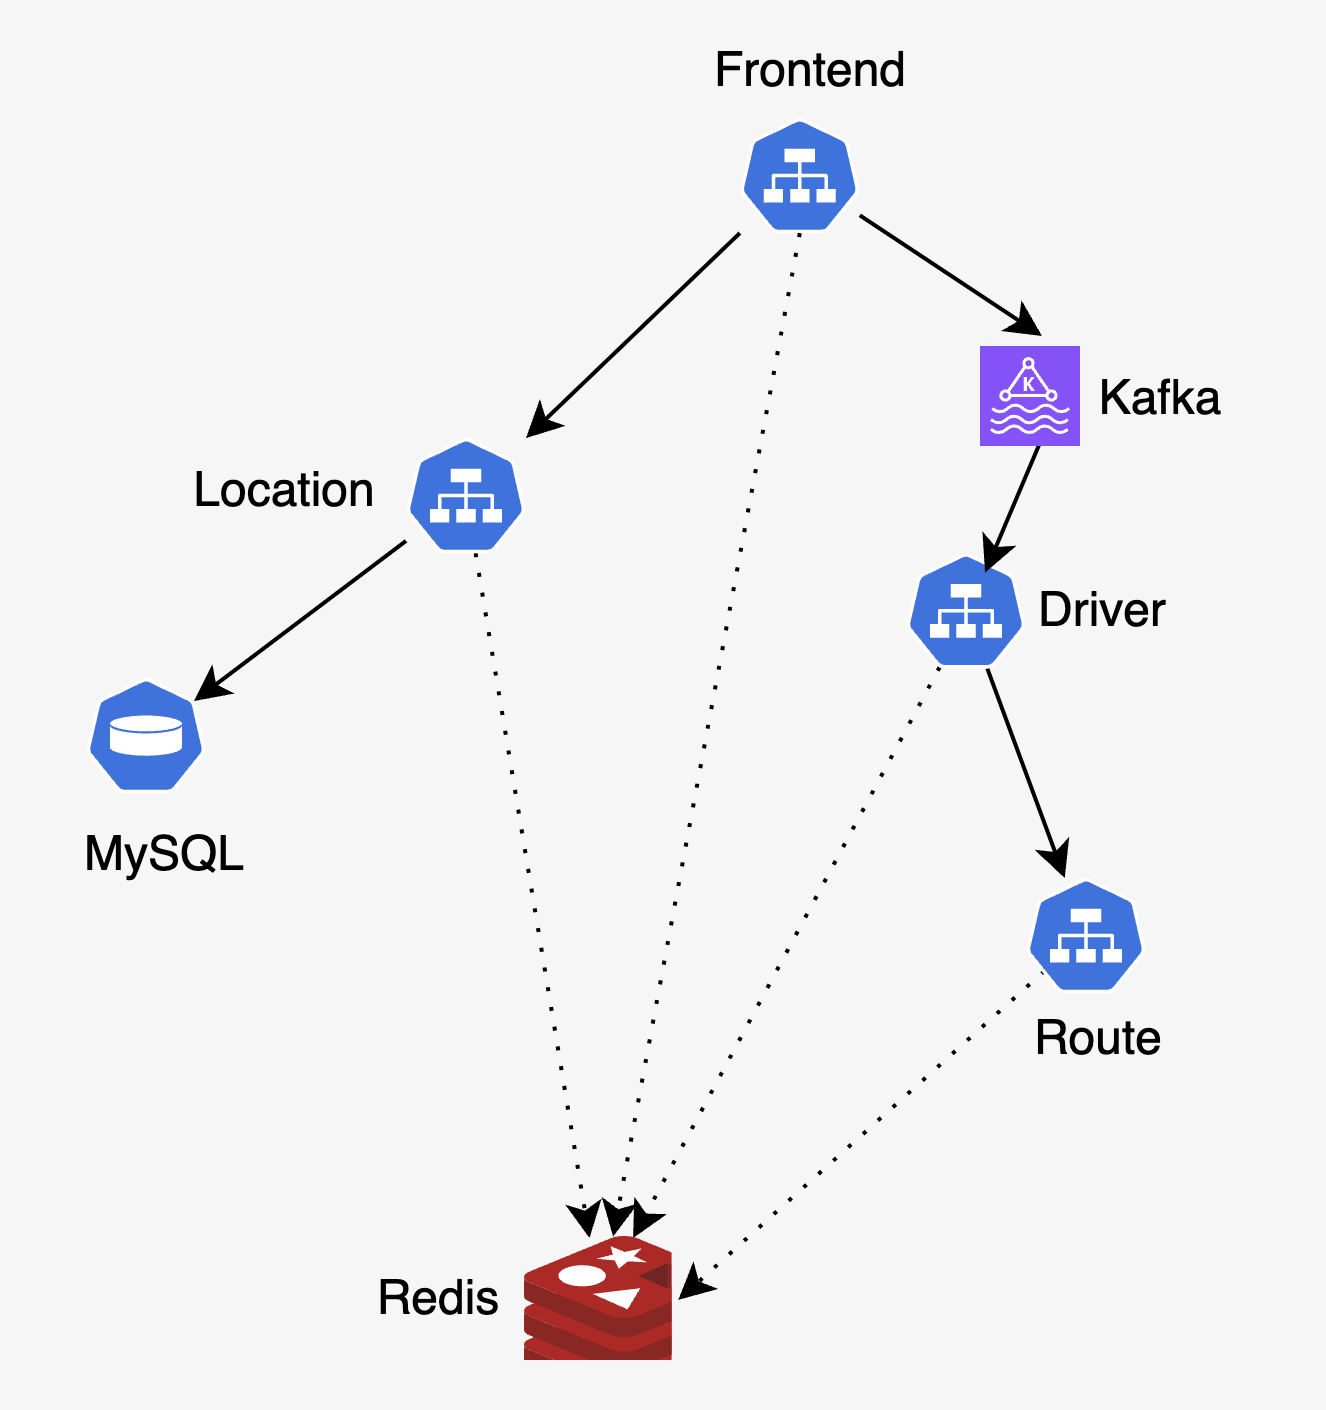
Demo App: HotROD
HotROD is a ride-sharing application with four microservices:
frontend: Web UI for requesting ridesdriver: Manages drivers in the systemroute: Calculates ETAslocation: Provides available pickup and dropoff locations for riders
The services use Kafka as a message queue, and Redis and MySQL for data storage.
Accessing the App's Frontend
First, authenticate with your Signadot account using the CLI:
signadot auth login
For more authentication options, see the CLI authentication guide. Once authentication is completed, you can connect to your cluster as shown below:
-
Create
$HOME/.signadot/config.yaml:local:
connections:
- cluster: <cluster> # From https://app.signadot.com/settings/clusters
type: ControlPlaneProxy -
Connect to the cluster:
signadot local connect -
Access the frontend at http://frontend.hotrod.svc:8080
In this tutorial, we're using Signadot's local connection capabilities to access the application for demonstration purposes. In practice, when working with preview environments, you would typically access your applications through your own staging URLs or ingress URLs that are already exposed from your cluster (e.g., https://staging.yourapp.com or https://pr-123.staging.yourapp.com). The local connection approach shown here is primarily useful for local development workflows.
Step 1: Create Sandboxes
Let's preview two new features using separate sandboxes. We'll start with the backend change to the driver service.
Backend Feature: Enhanced Driver Plates
First, let's preview the new plate number format (source: @signadot/hotrod#260):
name: driver-plates
spec:
  description: Adding SD- prefix to driver plates
  cluster: "@{cluster}"
  labels:
    feature: hotrod-plates
  forks:
    - forkOf:
        kind: Deployment
        namespace: hotrod
        name: driver
      customizations:
        images:
          - image: signadot/hotrod:f788b05bca80429425b814da62b2f17c3c564089-linux-amd64
            container: hotrod
- Run with UI
- Run with CLI
Click the button below to open and run this spec on Create Sandbox UI.
Run the below command using Signadot CLI.
# Save the sandbox spec as `driver-plates.yaml`.
# Note that <cluster> must be replaced with the name of the linked cluster in
# signadot, under https://app.signadot.com/settings/clusters.

signadot sandbox apply -f ./driver-plates.yaml --set cluster=<cluster>
Frontend Feature: Plate Highlighting
Now, let's preview the new UI feature (source: @signadot/hotrod#276):
name: frontend-highlight
spec:
  description: Add plate number highlighting in UI
  cluster: "@{cluster}"
  labels:
    feature: hotrod-plates
  forks:
    - forkOf:
        kind: Deployment
        namespace: hotrod
        name: frontend
      customizations:
        images:
          - image: signadot/hotrod:97de62bf5a6d91482f62db23de565282ff97e60d-linux-amd64
            container: hotrod
- Run with UI
- Run with CLI
Click the button below to open and run this spec on Create Sandbox UI.
Run the below command using Signadot CLI.
# Save the sandbox spec as `frontend-highlight.yaml`
# Note that <cluster> must be replaced with the name of the linked cluster in
# signadot, under https://app.signadot.com/settings/clusters.

signadot sandbox apply -f ./frontend-highlight.yaml --set cluster=<cluster>
Step 2: Access the Preview Environment
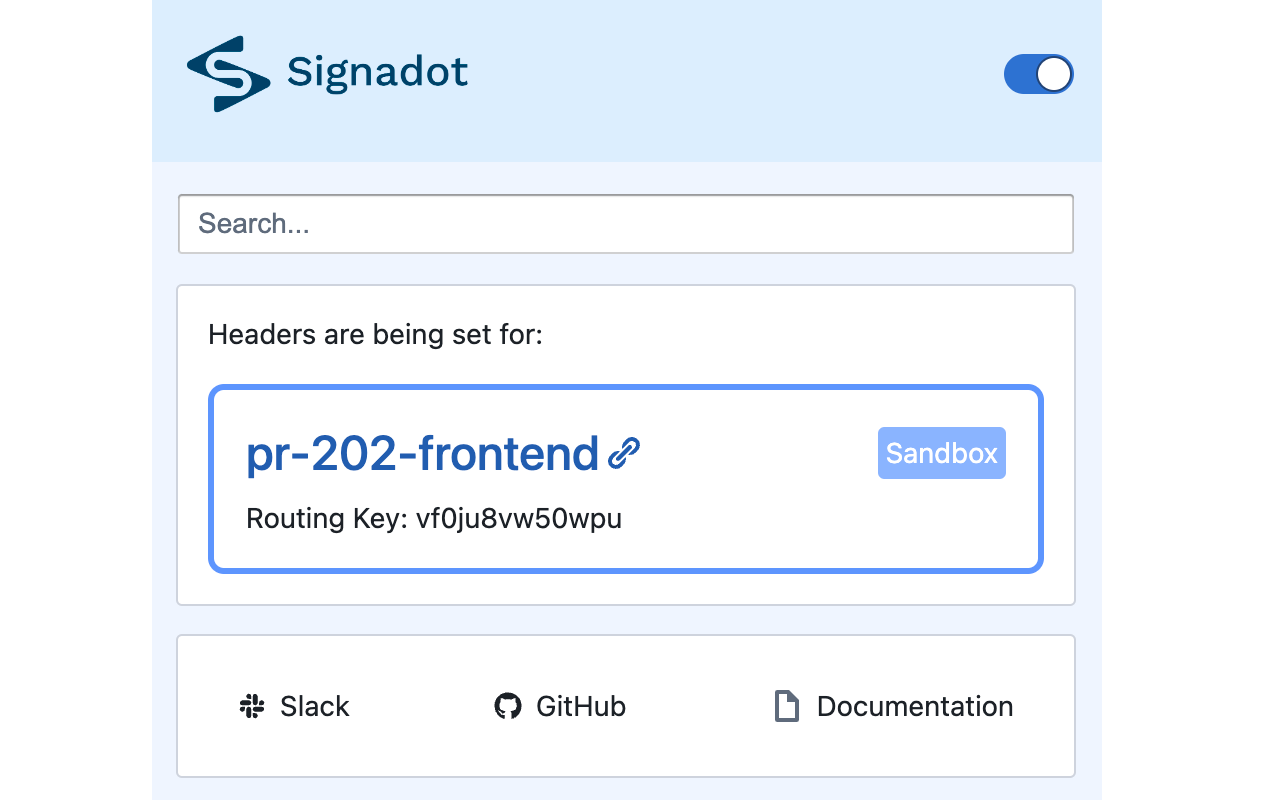
You can preview each feature independently using either the Signadot Chrome Extension or any header-setting extension:
- Signadot Chrome Extension (Recommended)
- Third-party Header-Setting Extension
- Install the Signadot Chrome Extension
- Open the extension and search for your sandbox name (e.g. "frontend-highlight")
- The extension will automatically set the correct routing key header:
- Install any header-setting extension like Requestly
- Configure it to set the
baggageheader with your sandbox's routing key:Wherebaggage: sd-routing-key=<routing-key><routing-key>is the value of routing key from sandbox's CLI output or dashboard.
For either option:
- Preview the backend change by setting the routing key from your
driver-platessandbox- You'll see driver plates with the "SD-" prefix (e.g., "SD-123ABC")
- Preview the UI change by setting the routing key from your
frontend-highlightsandbox- You'll see the new plate highlighting feature
- Visit http://frontend.hotrod.svc:8080 to see the changes
Step 3: Combine Features with a Route Group
Since both sandboxes are labeled with feature: hotrod-plates, we can create a route group to preview them together:
name: hotrod-plates-feature
spec:
  cluster: "@{cluster}"
  description: "route group for testing multiple sandboxes together"
  match:
    any:
    - label:
        key: feature
        value: hotrod-plates
Save the route group spec as plates-routegroup.yaml and apply it:
% signadot routegroup apply -f ./plates-routegroup.yaml --set cluster=<cluster>

Created route group "hotrod-plates-feature".
A unique routing key will be generated for your route group.

The route group "hotrod-plates" was applied and is ready.
Using either the Signadot Chrome Extension (where you'll see "hotrod-plates-feature" in the dropdown) or your own header-setting extension from above, set the routing key to your route group's value. When you visit http://frontend.hotrod.svc:8080, you'll see both features working together:
- Driver plates with "SD-" prefix
- Clickable plate numbers with highlighting
Note that while we used browser extensions to preview the frontend, you can use the same baggage header programmatically in any HTTP client like curl, Postman, or your application's test suite to route requests to your sandboxes.
This demonstrates how route groups let you combine multiple sandboxes to preview coordinated changes across services.
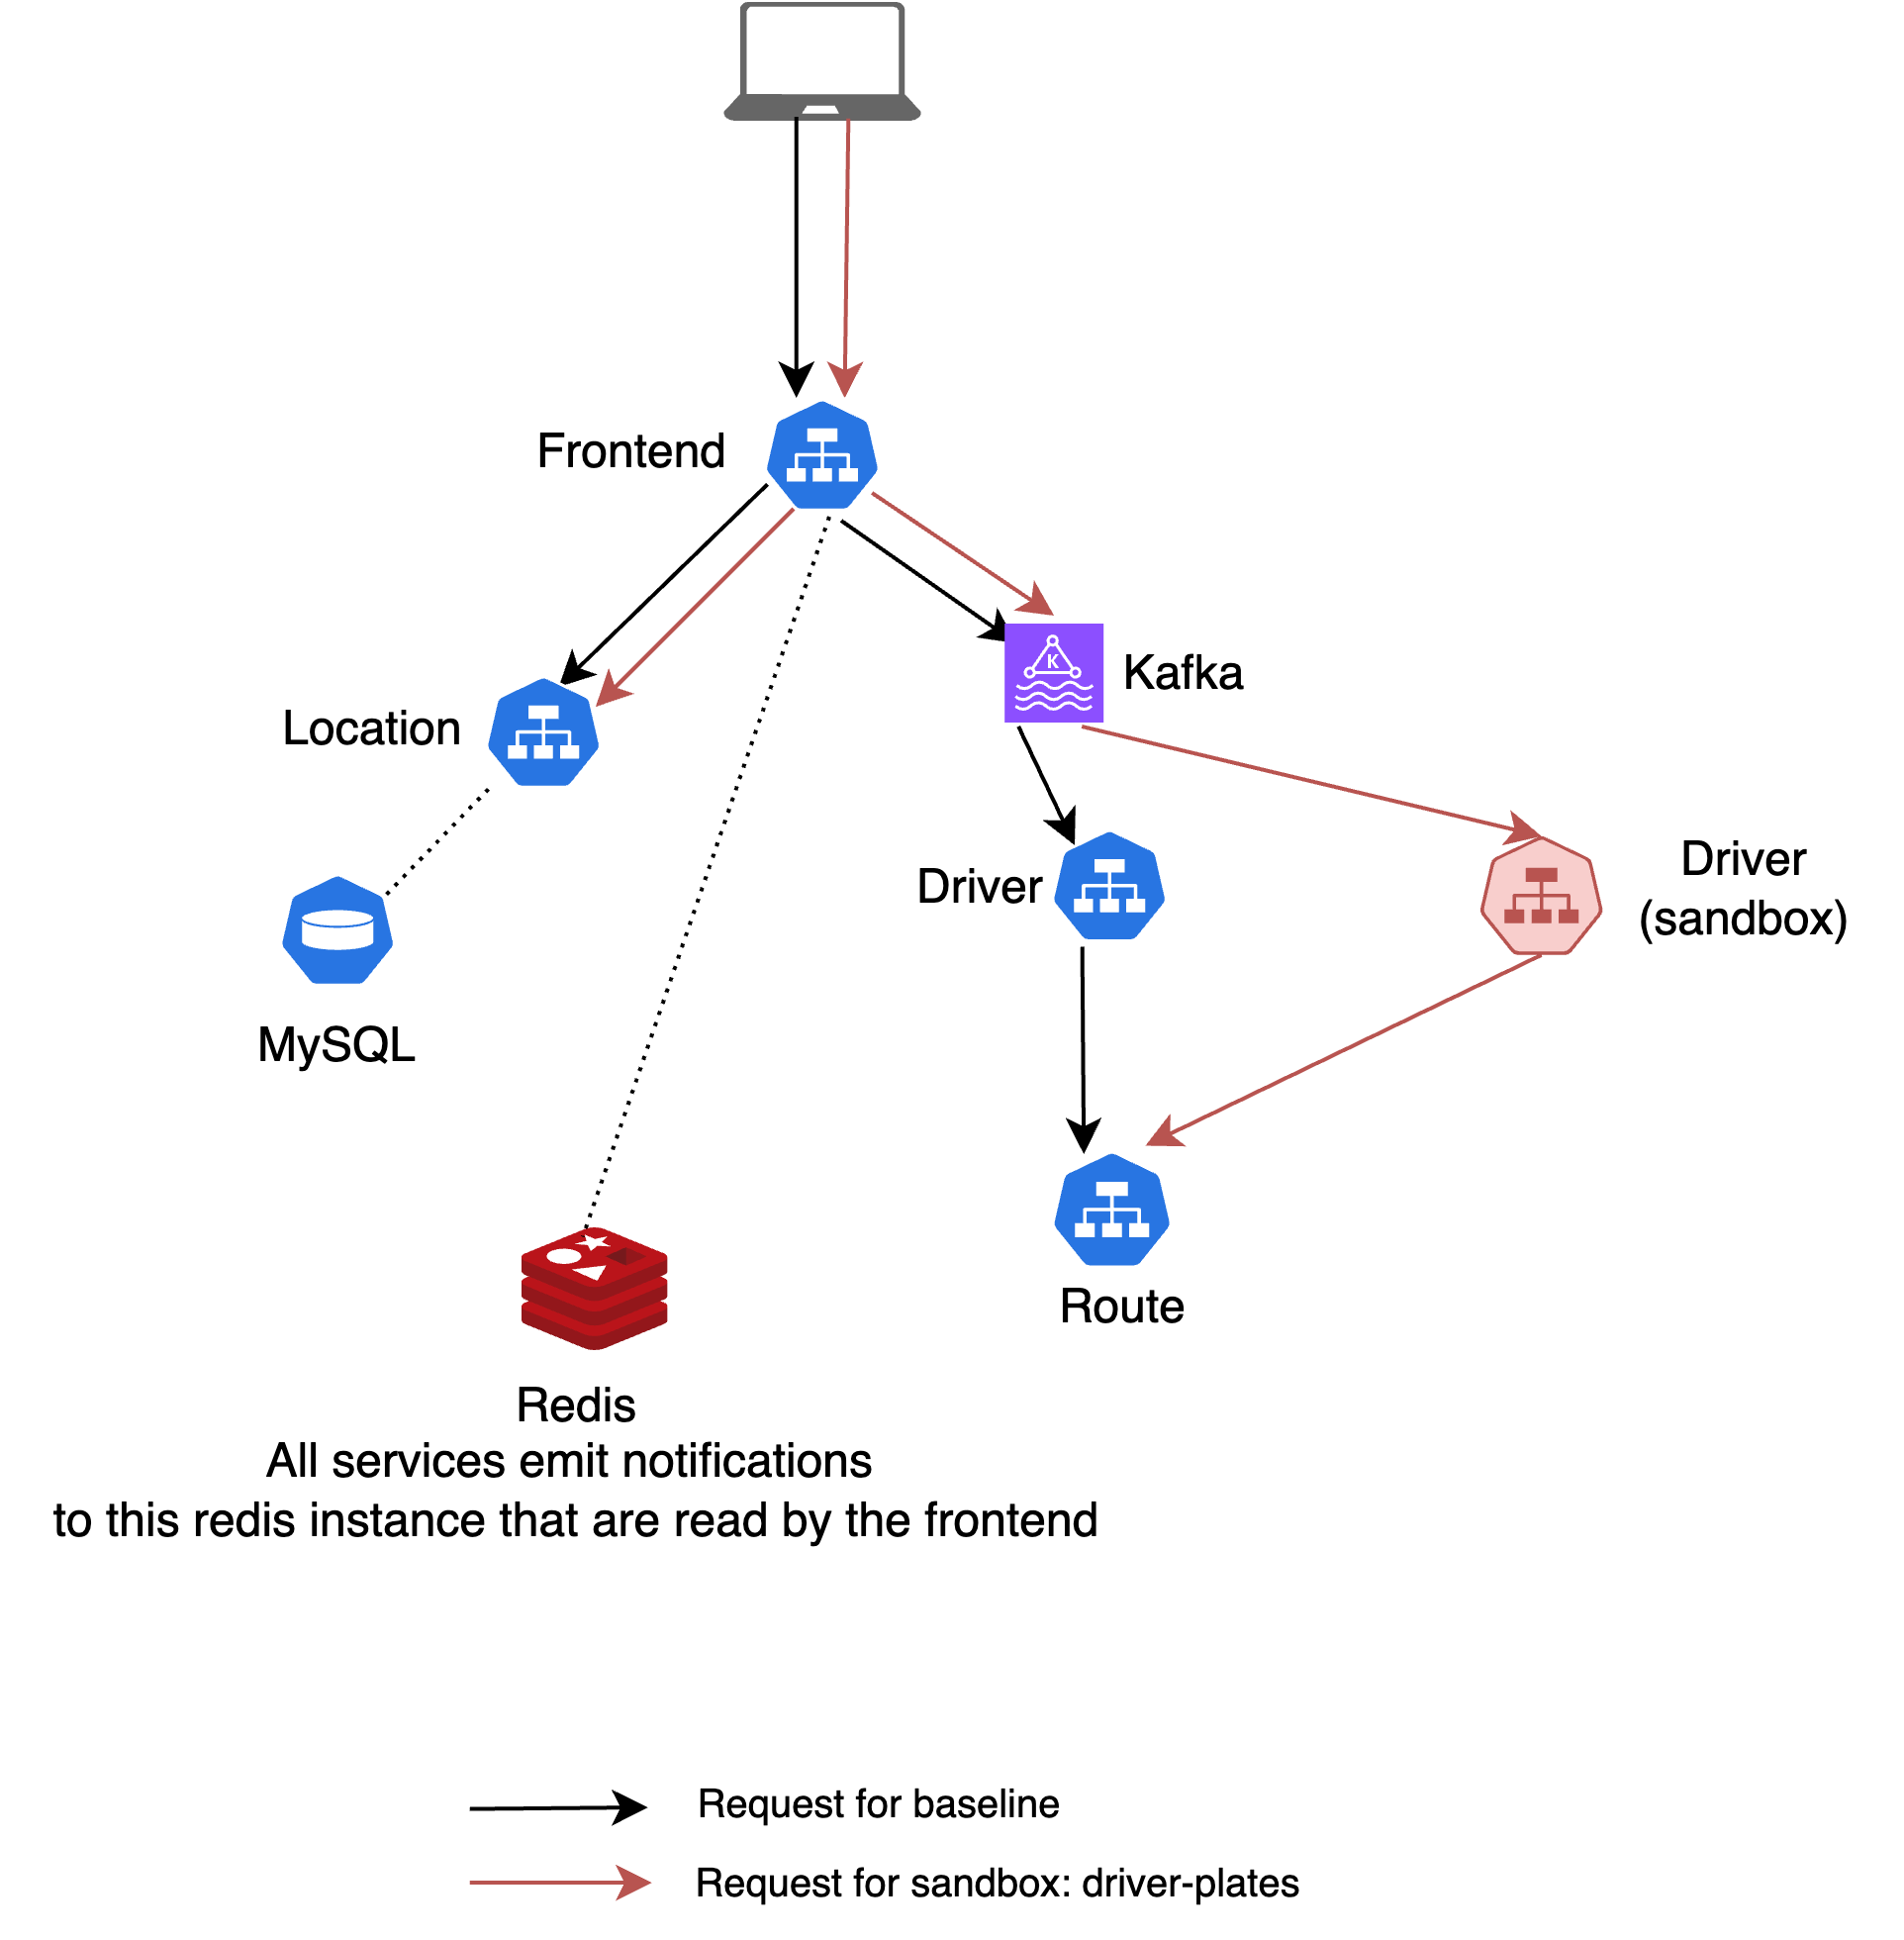
How Request Routing Works
With the application of the baggage header in your requests, traffic is routed based on which sandbox or route group you're targeting. For individual sandboxes, requests only go to the specific service you've forked. For the route group, requests are routed to both forked services, allowing you to preview the features together.
The actual routing is accomplished using either:
- A service mesh like Istio or Linkerd
- Signadot's built-in DevMesh sidecars (enabled by adding the
sidecar.signadot.com/inject: "true"annotation to your baseline deployments). For more details on setting up request routing with DevMesh, see our DevMesh Guide.
For routing to work across service-to-service calls, the baggage header needs to be propagated. This is typically done using distributed tracing libraries like OpenTelemetry, which can automatically instrument your code to propagate headers with minimal changes. Note that this doesn't require a tracing backend - the instrumentation libraries are sufficient for header propagation. Many languages support auto-instrumentation that requires no code changes at all. See our Header Propagation Guide and the OpenTelemetry documentation for more details.
The diagrams below show how requests are routed for the baseline and the 2 sandboxes we created.
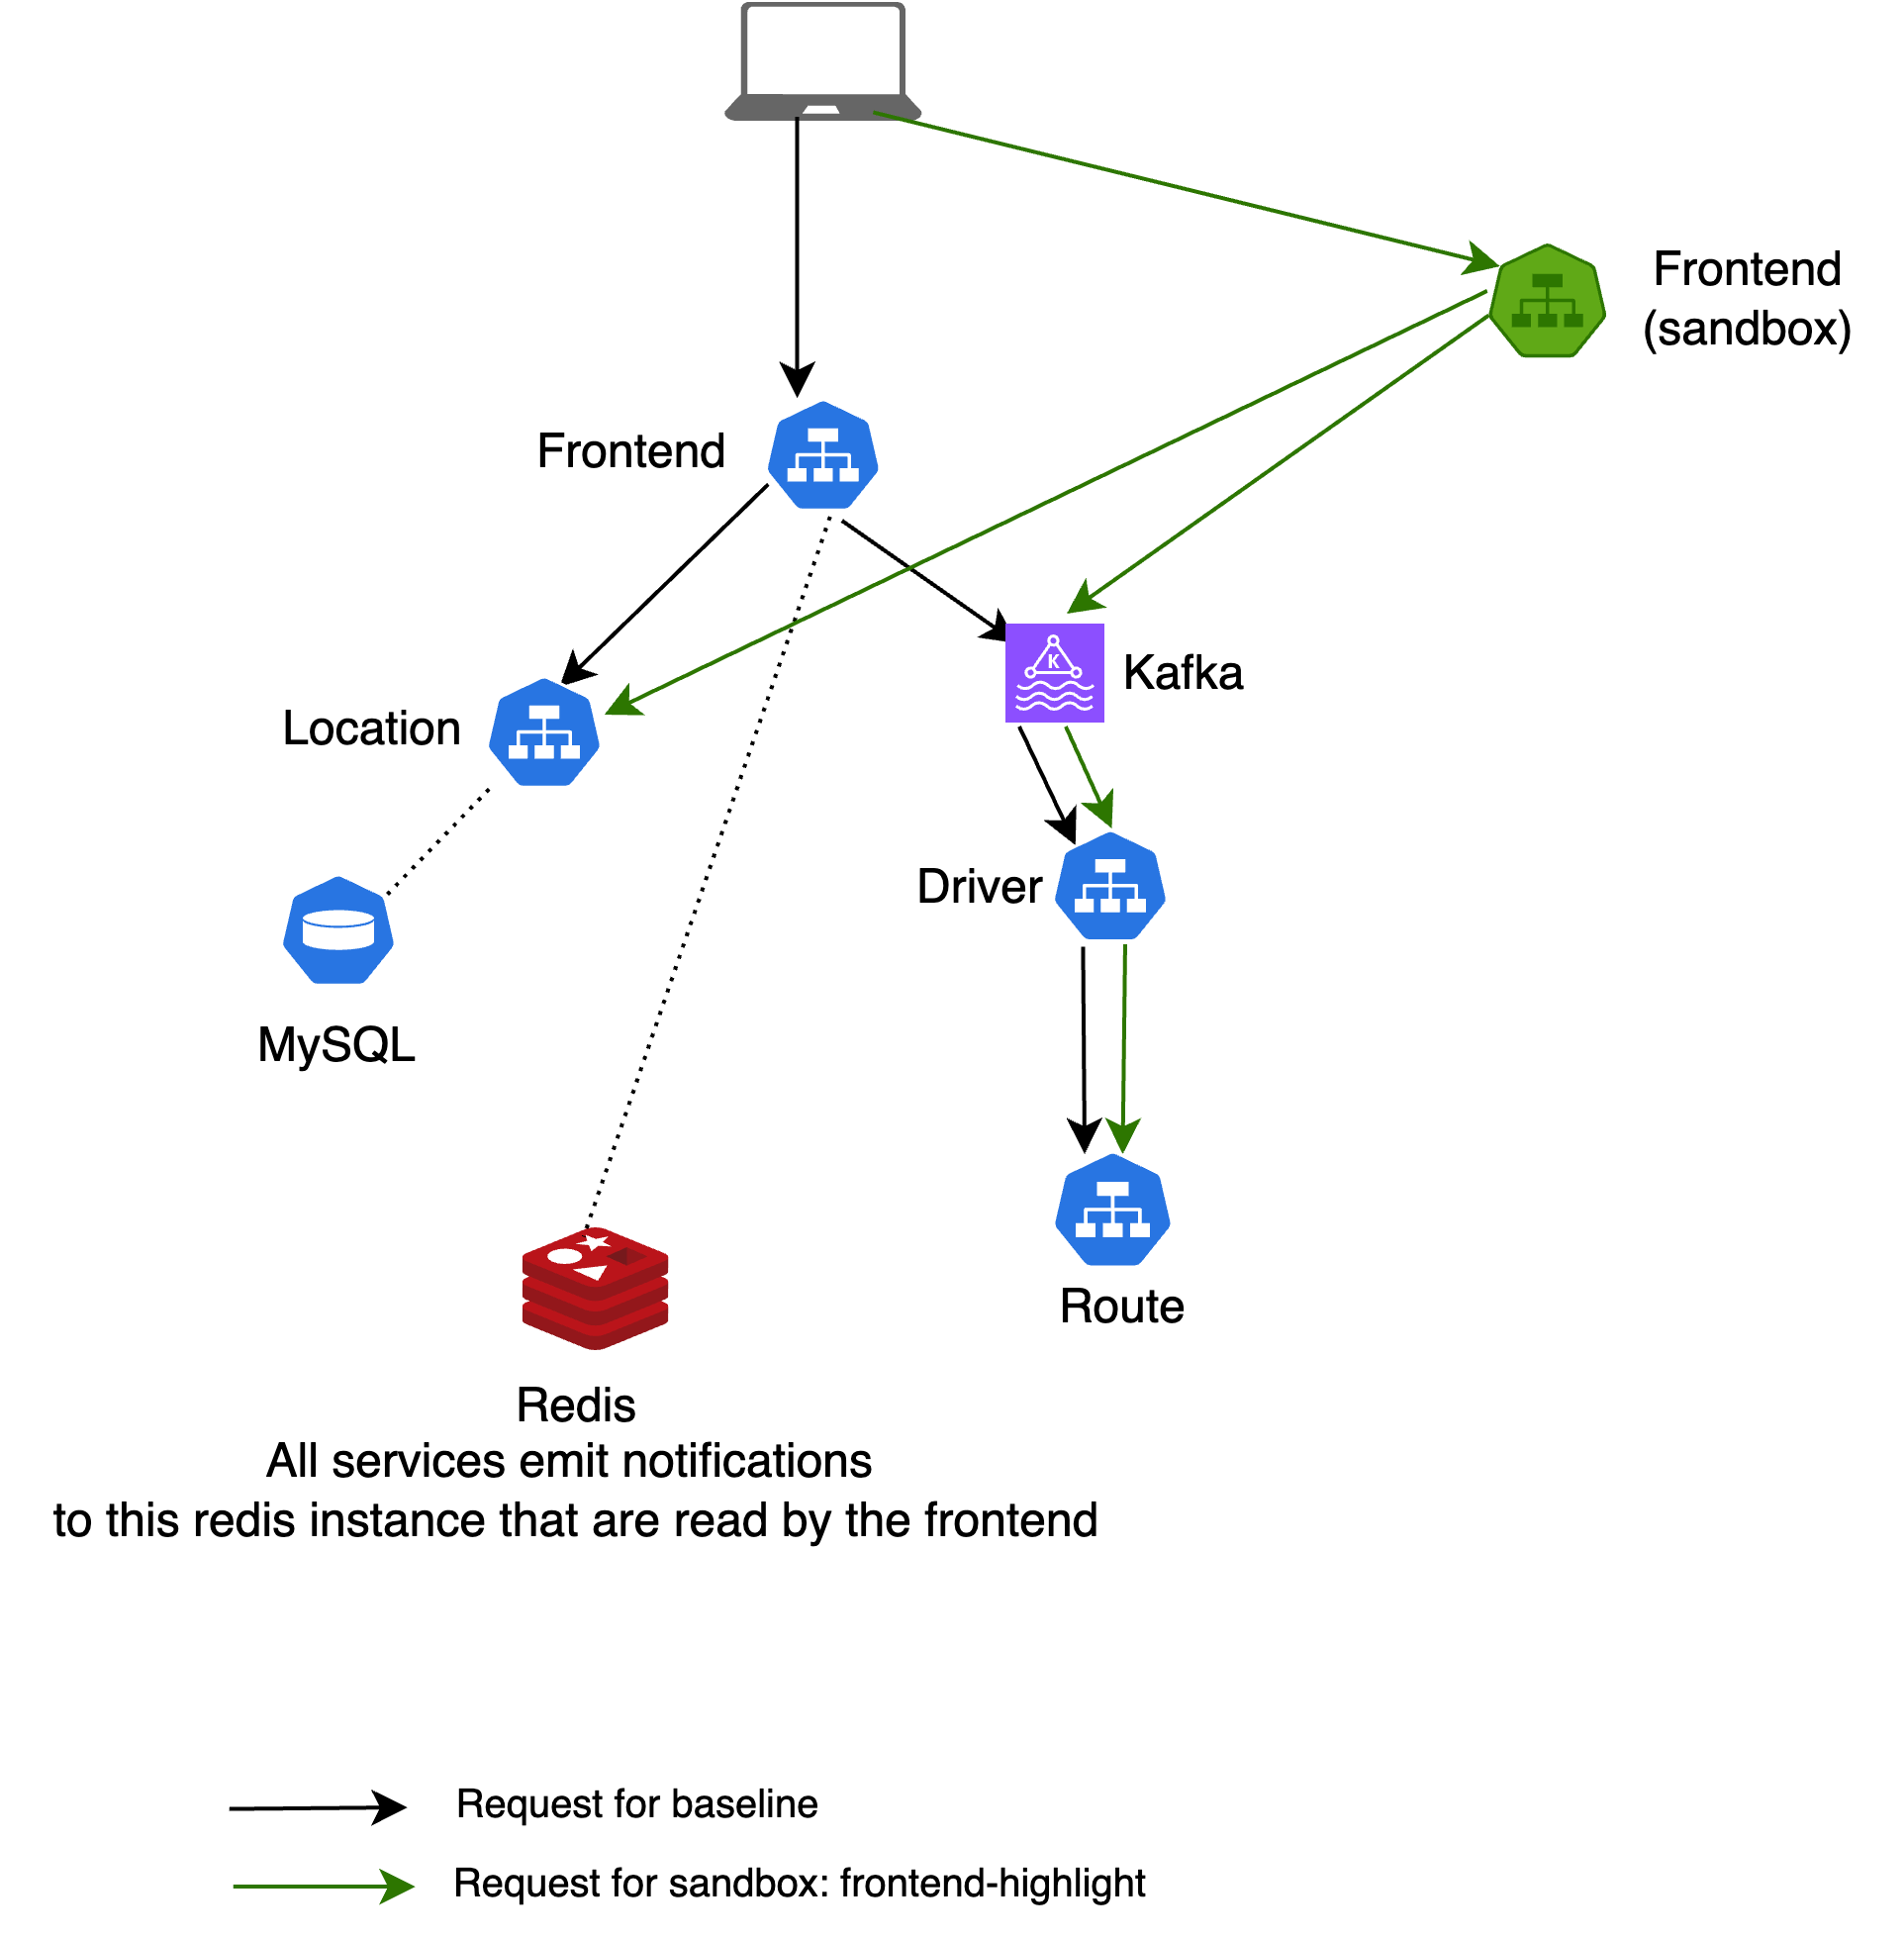
When using a route group, it simply combines both routing rules into one context, allowing the request to flow through both sandboxes simultaneously.
Conclusion
Congrats! You have tested new features in Kubernetes using Sandboxes. Sandboxes enable many powerful testing and development workflows - to learn more about what you can do with them, check out our how-to guides for common patterns and best practices. To understand the underlying concepts in more depth, see our Sandbox Concepts documentation.