Set up Developer Access
Overview
This guide outlines approaches for enabling developers to efficiently access and utilize Signadot sandboxes, covering both pull request and local development environments.
Prerequisites
Before implementing developer access methods, ensure you have:
- Set up at least one type of sandbox environment:
- Pull request sandboxes for testing code changes, OR
- Local development sandboxes for local testing
- Configured request routing and sandbox isolation:
- Request routing for directing traffic to sandboxes
- Context propagation for maintaining request context
- Any required resource plugins (databases, etc.) for data isolation
Access Methods
Once sandboxes are created, there are several ways to provide access to them:
1. Chrome Extension for Web Applications
The Signadot Chrome Extension provides a simple way to access sandboxes when testing web applications. It automatically injects the appropriate routing headers into all browser requests.
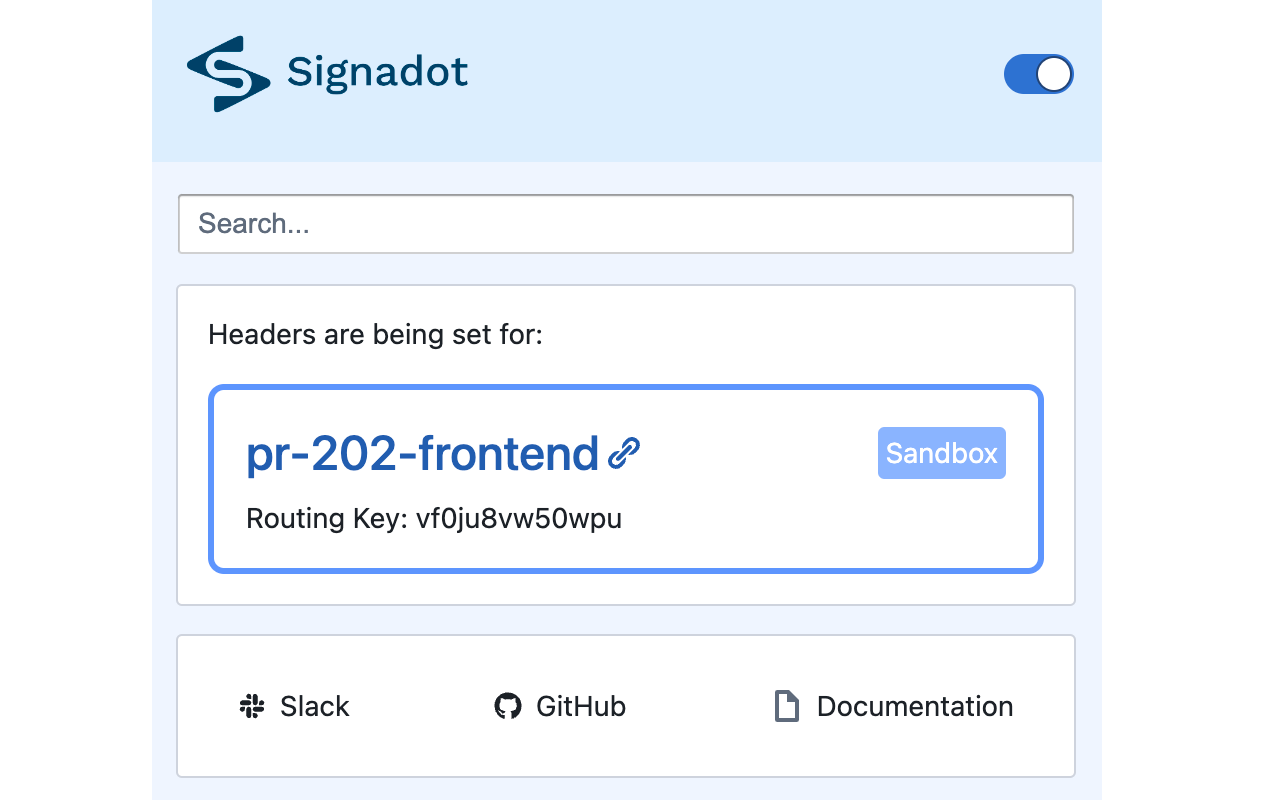
Benefits of this approach:
- Simple Selection: After authenticating, users see a dropdown of available sandboxes and route groups
- Easy Toggle: Users can enable/disable routing to sandbox environments with one click
- No Code Changes: Works with existing staging or production URLs
The extension sets these headers automatically:
baggage: sd-routing-key=vf0ju8vw50wpu
ot-baggage-sd-routing-key: vf0ju8vw50wpu
tracestate: sd-routing-key=vf0ju8vw50wpu
uberctx-sd-routing-key: vf0ju8vw50wpu
You can also use third-party tools like Requestly or similar header modification extensions to inject routing headers during local development and testing. These tools provide a convenient way to manage headers across different environments and test scenarios.
2. Testing with Headers
For testing APIs or services directly, developers can manually set routing headers. This works for both PR sandboxes and local development sandboxes.
The appropriate header can be added to API client requests (Postman, cURL, gRPCurl, etc.):
curl -H 'baggage: sd-routing-key=<sandbox-routing-key>' http://your-service.example.com/api/...
The exact header to use may depend on your service's instrumentation library. By default, Signadot supports OpenTelemetry standard headers, but your services might be using other propagation standards. See our header propagation guide for details on supported headers and configuration.
To streamline this process:
- Consider adding the routing key to PR comments when a sandbox is created
- Provide tooling that helps developers find and use sandbox keys
- Document the header format for various client tools used by your teams
3. Hosted Preview URLs
For more seamless access, especially for stakeholders who don't need to install extensions, you can configure hosted preview URLs.
These URLs (in the format *.preview.signadot.com) automatically route traffic to the appropriate sandbox without requiring header manipulation. Configure these by modifying the sandbox spec as detailed in the preview URLs documentation.
When using preview URLs with frontends, you may encounter CORS issues that don't occur when using the Chrome extension or manual headers.
Advanced Patterns
Testing Across Multiple Services with RouteGroups
For testing changes that span multiple services, RouteGroups allow combining multiple sandboxes into a unified test environment:
- Create individual sandboxes for each service
- Define a RouteGroup that combines these sandboxes (typically based on labels)
- Share the RouteGroup's routing key for unified testing
This approach is valuable when:
- Changes span multiple microservices
- Different teams are working on related features
- You need to test the integration of multiple concurrent PR changes
Refer to the RouteGroups documentation for setup details.
Mobile Application Testing
For mobile applications:
- Create debug builds that accept routing keys as parameters
- Document how developers can insert the sandbox routing key
- Consider automating routing key distribution in your development workflow
This enables testing backend changes through the mobile client.
Best Practices
Surfacing Routing Keys
Make routing keys easily accessible:
- Include them in PR comments when sandboxes are created
- Add them to your developer portal or documentation
- Create tooling to help retrieve relevant sandbox keys
Organizing Sandboxes with Labels
Use consistent labeling based on:
- Git branch names
- Repository information
- Feature or team identifiers
These labels organize sandboxes and enable automatic grouping in RouteGroups.
Automating RouteGroup Creation
Consider automating RouteGroup creation:
- Use conventions like branch naming patterns to group related sandboxes
- Create tooling that allows selecting which sandboxes to group
- Ensure the RouteGroup's routing key (separate from individual sandbox keys) is accessible
Conclusion
By implementing these access methods, you can provide developers with a seamless experience for interacting with sandbox environments. This enables efficient testing of changes in isolation while maintaining the benefits of a production-like environment.
The right combination of these approaches improves development velocity while preserving stability in shared environments. Focus on minimizing the friction in accessing sandboxes to maximize their value.