Uncover the intricacies of testing against 3rd-party APIs and the innovative solution of API mocking. The article delves into the essential features to consider when picking a mocking framework, and presents a comparative analysis of four prominent libraries - MockServer, WireMock, Mockoon, and Mountebank.
Testing against 3rd-party APIs is a huge challenge. You have limited control over the API’s behavior, making it difficult to reproduce specific scenarios, edge cases, or errors; You can’t test extensively without hitting rate limits and incurring additional costs; you’re dependent on the providers availability and performance so are limited on what you can achieve; and there are real security concerns with exposing your internal test environments to work with external APIs.
The answer to these problems is API mocking. But mocking APIs presents its own challenges. Now you have to find a set up that will work to mock all your 3rd-party providers with all their complexities and variabilities, and maintain these over time.
However, as we’ll explore later, mocking alone has significant limitations that often lead teams to seek hybrid approaches combining mocked and real environment testing.
To help you, there are a number of mocking frameworks available. Here we want to go through some examples of these frameworks with a real-life situation we’ve seen recently–the need to mock Fiserv endpoints in fintech. We’ll look at how you might choose the right framework for your use case, and how sandboxes can help you switch seamlessly between mocked and real APIs for testing.
You’re a fintech using the Fiserv API. You have a lot of functionality to build out around your API calls, so a lot of testing is required. But your staging and testing clusters are behind a VPN which the Fiserv API isn’t expecting. Exposing these environments to the web is a security concern. So you need to mock the API.
The Fiserv API is well-documented, so building out the correct functionality is achievable. Choosing which mocking framework to build upon will require some thought. You are looking for:
These attributes aren’t just important for the Fiserv API mocking, they are important for future API testing. You are looking to mock the Fiserv API now, but you’ll need a framework that will serve as the basis for all your mocks going forward.
Let’s look at how four of the main mocking libraries available–Mockserver, Wiremock, Mockoon, and Mountebank–stack up.
MockServer is a powerful mocking library that provides an extensive set of features that facilitate testing applications by isolating external dependencies and simulating various scenarios. It’s a Java-based framework, but, as it exposes a REST API, you can use it as a standalone server with any language. If you are within the Java ecosystem though, you can embed it in your application, or use a JUnit rule.
It supports:
In all it does have a good degree of flexibility, but is better-suited for larger and more complex projects.
To use MockServer, first include the MockServer dependencies in your project. For Maven, add the following to your pom.xml:
... org.mock-server mockserver-netty 5.11.2 test ... ''
For Gradle, add this to your build.gradle:
`dependencies { ... testImplementation 'org.mock-server:mockserver-netty:5.14.0' ... }`Start a MockServer instance in your test setup. If you’re using JUnit, you can use the MockServerRule:
`import org.junit.Rule; import org.mockserver.client.MockServerClient; import org.mockserver.junit.MockServerRule; public class FiservApiTest { @Rule public MockServerRule mockServerRule = new MockServerRule(this); private MockServerClient mockServerClient; }`Now, create stubs for the Fiserv API endpoints you want to mock. In this example, we’ll stub a simple API call to get customer details.
`import org.junit.Before; import org.mockserver.model.HttpRequest; import org.mockserver.model.HttpResponse; public class FiservApiTest { // ... @Before public void setUp() { mockServerClient = new MockServerClient("localhost", mockServerRule.getPort()); mockServerClient.when( HttpRequest.request() .withMethod("GET") .withPath("/api/v1/customer/123") ) .respond( HttpResponse.response() .withStatusCode(200) .withHeader("Content-Type", "application/json") .withBody("{\"id\": \"123\", \"name\": \"John Doe\", \"email\": \"johndoe@example.com\"}") ); } // Your tests go here }`Make sure your application uses the MockServer URL instead of the actual Fiserv API URL during testing. You can achieve this by passing the MockServer URL to your application or configuring it as an environment variable.
In your test setup, instantiate the FiservApiClient with the MockServer URL:
`public class FiservApiTest { // ... private FiservApiClient fiservApiClient; @Before public void setUp() { // Stub Fiserv API endpoints as shown previously fiservApiClient = new FiservApiClient("http://localhost:" + mockServerRule.getPort()); } // Your tests go here }`Now you can write tests for your application that use the mocked Fiserv API endpoints. Additionally, you can verify if the expected interactions with the API occurred during the test execution.
`import static org.junit.Assert.assertEquals; import org.mockserver.verify.VerificationTimes; public class FiservApiTest { // ... @Test public void testGetCustomerDetails() { // Call the method in your application that uses the Fiserv API Customer customer = fiservApiClient.getCustomerDetails("123"); // Verify the expected customer details assertEquals("123", customer.getId()); assertEquals("John Doe", customer.getName()); assertEquals("johndoe@example.com", customer.getEmail()); // Verify the interaction with the MockServer mockServerClient.verify( HttpRequest.request() .withMethod("GET") .withPath("/api/v1/customer/123"), VerificationTimes.exactly(1) ); } }`In this example, we are testing the getCustomerDetails method in the FiservApiClient class, which should make a request to the Fiserv API and return a Customer object. We verify that the returned Customer object has the expected details and that our application made the correct request to the MockServer. We’d then implement the getCustomerDetails method in a FiservApiClient class.
Wiremock is extremely similar to MockServer, with the same features of request matching, dynamic responses, and response templating. WireMock does have better fault injection, allowing you to simulate faults in your mocked services, such as malformed responses, empty responses, or randomly dropped connections. It also includes stub mappings on JSON if you have a large number of stubs in your project.
Again, it’s written in Java and the setup is almost identical to MockServer. First, include the WireMock dependency in your project. If you’re using Maven, add the following to your pom.xml:
... com.github.tomakehurst wiremock-jre8 2.31.0 test ...
If you’re using Gradle, add this to your build.gradle:
`dependencies { ... testImplementation 'com.github.tomakehurst:wiremock-jre8:2.31.0' ... }`From there, it’s the same as with MockServer, just using WireMockRule instead of MockServerRule.
Mockoon differs from MockServer and WireMock in that it is a desktop application with a user-friendly graphical interface, making it easier to set up and manage mock endpoints.
Its focus is on simplicity, so it doesn’t have a huge amount of flexibility or extensibility. Though it does have dynamic route configuration and support for both templating and latency simulation.
But Mookoon is more suited for simpler projects, manual testing, or when working with non-technical stakeholders.
To achieve somewhat of the same functionality as MockServer and WireMock using Mockoon, first download and install Mockoon.
Then create a new Mockoon environment. To do so, open Mockoon and click on the “Create a new environment” button. Set the environment’s port to your desired value (e.g., 3000). Make sure to start the environment by clicking the “Start” button on the top right corner.
Next you need to add a route to mock the Fiserv API. Click on the “Add route” button and configure the route with the following details:
Method: GET
Endpoint: /api/v1/customer/123
Status code: 200
Headers: Content-Type with a value of application/json
Body (Raw):
{ "id": "123", "name": "John Doe", "email": "johndoe@example.com" }
Make sure your application uses the Mockoon server URL instead of the actual Fiserv API URL during testing. You can achieve this by passing the Mockoon server URL to your application or configuring it as an environment variable.
If we are following on from the examples above, we’d instantiate the FiservApiClient with the Mockoon URL:
`public class FiservApiTest { // ... private FiservApiClient fiservApiClient; @Before public void setUp() { fiservApiClient = new FiservApiClient("http://localhost:3000"); } // Your tests go here }`Now you can write tests for your application that use the mocked Fiserv API endpoints:
`import static org.junit.Assert.assertEquals; public class FiservApiTest { // ... @Test public void testGetCustomerDetails() { // Call the method in your application that uses the Fiserv API Customer customer = fiservApiClient.getCustomerDetails("123"); // Verify the expected customer details assertEquals("123", customer.getId()); assertEquals("John Doe", customer.getName()); assertEquals("johndoe@example.com", customer.getEmail()); } }`Note that Mockoon doesn’t provide built-in verification for interactions like WireMock or MockServer do.
Mountebank is a JavaScript-based, over-the-wire test double. The main benefit of Mountebank is that it supports multiple protocols, not just HTTP/HTTPS that MockServer and WireMock concentrate on.
Also, being a Node library, it is tightly integrated with the Node ecosystem, which fits better with Node/JS-based applications and teams. MockServer and WireMock require JVM and Java knowledge to use all their capabilities. Mountebank also has stateless operation, making it easy to reset the state between tests or parallelize test runs.
Overall, Mountebank’s support for multiple protocols, cross-platform compatibility, language-agnostic configuration, extensibility, and stateless operation can set it apart from WireMock and MockServer.
As Mountebank fits in the JavaScript ecosystem, let’s use it with a Node application. Using Mountebank with a Node.js app typically involves setting up a mock server, defining the expected API behavior, and configuring your app to use the mock server during testing.
First, install Mountebank on your machine:
`npm install -g mountebank`To start mocking, create a JSON file (e.g., imposters.json) to define the mocks for the Fiserv API endpoints your Node.js app interacts with. This configuration sets up an imposter on port 8080 with a mocked POST endpoint for /fiserv/transfer.:
`{ "imposters": [ { "port": 8080, "protocol": "http", "stubs": [ { "predicates": [ { "equals": { "method": "POST", "path": "/fiserv/transfer", "headers": { "Content-Type": "application/json", "Authorization": "Bearer some_valid_token" } } } ], "responses": [ { "is": { "statusCode": 200, "headers": { "Content-Type": "application/json" }, "body": { "status": "success", "message": "Transfer completed" } } } ] } ] } ] }`Then you can start the Mountebank server by running the mb command with the imposter configuration:
`mb --config imposters.json`Here we’ll create a small Node app to test, but this would live in the code you are testing:
`const axios = require('axios'); const performTransfer = async () => { try { const requestBody = { fromAccount: '123456789', toAccount: '987654321', amount: 100 }; const headers = { 'Content-Type': 'application/json', 'Authorization': 'Bearer some_valid_token' }; const response = await axios.post('http://localhost:8080/fiserv/transfer', requestBody, { headers }); console.log(response.data); } catch (error) { console.error('Error performing transfer:', error.message); } }; performTransfer();`This code defines a function called performTransfer that makes a POST request to the mocked Fiserv API at http://localhost:8080/fiserv/transfer using Axios. It then logs the response data to the console.
When you run the app, it should output the following data (or an error):
`{ "status": "success", "message": "Transfer completed" }`This data comes from the Mountebank mock server, as defined in the imposters.json configuration. The Node.js app is interacting with the mocked Fiserv API, allowing you to test the app’s behavior without relying on the external service.
You can modify the imposters.json configuration to create different API responses and test how your app handles various scenarios.
If you are purely within the Java ecosystem, then MockServer and WireMock are the best options. If you are building something beyond just Java, then Mountebank is a better option (If you are completely new to mocking, Mockoon is a good place to start, but switching to a code-based mocking tool is going to be necessary in the long run).
Another consideration is how you are going to serve the mocks. Are you going to:
Depending on your architecture and maturity, the second option is likely to make more sense. The same set of APIs will need to be mocked for many different services. Building out team defaults for these mocked APIs puts less burden on the team, makes the mocked APIs more robust, and standardizes your mocking architecture and configuration.
Mocking the API endpoints is only half the story when it comes to testing with 3rd-party APIs. At some point you want to swap back the actual API in staging or testing to ensure you can still run end-to-end tests against the real 3rd-party dependencies as needed.
This is where the limitations of mocking become apparent. As discussed in why mocks fail for real-environment testing, mocked environments can’t fully replicate production behavior, making it essential to validate changes against real dependencies before deployment.
You can do this via Signadot Sandboxes. Effectively, you two versions of your code:
The second version uses a Sandbox for isolation, but still connects to all your other dependencies and services:
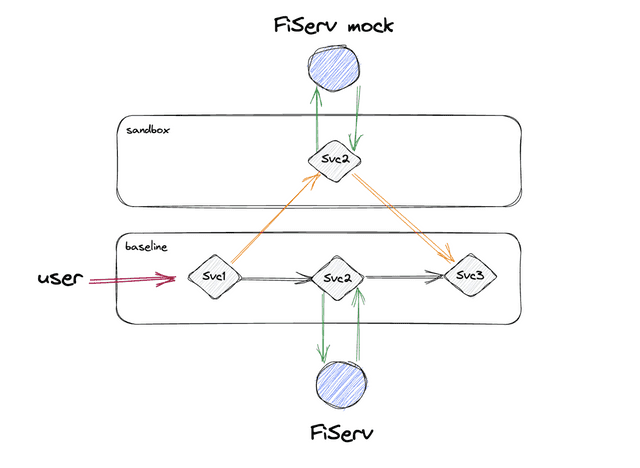
So you continue to use your baseline, but can set up a Sandbox with the environment variables that point to the mock destination service.
This approach gives you the best of both worlds: the speed and control of mocked testing during development, and the confidence of real API validation when needed. Learn more about using Signadot sandboxes for API testing in our detailed tutorial.
Embracing the power of API mocking can truly revolutionize your testing and development processes when working with third-party APIs. By overcoming the challenges of limited control, rate limits, dependency on providers, and security concerns, you can unlock a world of possibilities. The availability of various mocking frameworks provides a wide array of options to suit your specific needs, allowing you to efficiently mock complex and variable third-party providers.
With the ability to seamlessly switch between mocked and real APIs using sandboxes, you gain the flexibility to thoroughly test your application without compromising on reliability. This empowers you to reproduce specific scenarios, edge cases, and errors, ensuring robustness and stability in your product. Moreover, the cost savings and enhanced productivity resulting from mocking APIs are significant advantages that cannot be overlooked.
Get the latest updates from Signadot

